
 |
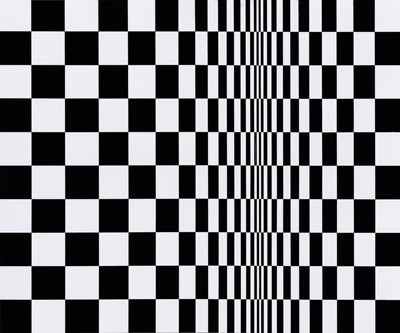
| Movement in Squares by Bridget Riley |
The 6th graders took a look at some of Bridget Riley's paintings and we talk about how op art works: It is a figure/ground relationship. I show them the well known face/vase optical illusion.
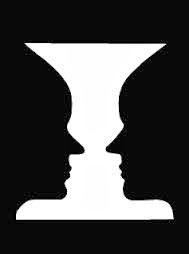
I explained that our eyes will automatically see one or the other: the vase or the two faces looking at each other. We have the ability to train our eyes to see both but our eyes will see one or the other at first. The figure is the object that you see coming out at you and the ground is the object that is pushed back into space.
I also show them a video of the work of Victor Vasarely. I found a link to this video on You Tube through this Pinterest site. Pretty cool video!

The 6th graders created their own op art. They started with a quarter-size circle in the middle of their paper and then added more circles around it. I had to warn the students not to draw too many circles because the first time I taught this project I noticed that the students will easily go overboard with the amount of circles and lines that they draw.
After the students drew concentric circles they drew 5-7 interesting lines. I encouraged the students to draw interesting but simple lines.
The next step was to mark all of the areas that would be painted black. We did this with a small pencil mark inside each shape that was designated to be black. The designs were painted like an irregular checker board. There were no two black shapes side-by-side and no two white shapes side-by-side.

When it was time to paint I demonstrated a few tips on painting neatly.
1. Point your paint brush toward the outside edge of the shape to get the smoothest line possible.
2. Hold your brush like a pencil and down by the bristles.
3. Reload your paint brush when it starts to get dry.


During the 16 years that I have taught, there have been some things that I have realized are important when teaching this number of 5th and 6th graders (close to 1,000) with once-a-week-for-40-minutes-schedule. I want to keep my students engaged in my lessons, and it is easy to loose the interest of students when projects take too many weeks to complete. There are some wonderful projects out there that I would love to teach to my students and I have, unfortunately had to rule them out because they are too lengthy.
I am always trying to find the right balance between lessons that are meaningful to the students, align with the state visual art standards and use practical materials. Practical to me means that the students can clean it up within a 5 minute time frame. Taking more than 5 minutes to clean up takes away from precious work and instruction time when you have 40 minutes for each class. It is difficult to choose lessons that meet these criteria and fit in one, two or three 40 minute classes.
...AND now that we are adapting the SLO's to our evaluations this has brought more to the table when it comes to choosing what will be included in the assessments. This year is our pilot and next year we will using the new evaluation system completely. I have been working on developing what I can at this time, of my SLO's and choosing lessons that fit. I feel like it has already made me a better teacher, but I am still in the thick of it!

Tell me your thoughts on this in the comment section! I would love to hear how you deal with these issues when planning your art lessons! Feel free to disagree with me too! My feelings will not be hurt.
Warrior's Choice: Chalk boards
