Tuesday, May 20, 2014

Lebanon City Schools Art Show

The art show was a success.  I could not have done it all without the help of these two super heroes, my Mom and Dad!  They helped prepare, pack and hang up the art work.  Our district art show is at the high school and so I pack it all up, load my car and drive the art work over to the high school.  
All of the students did a great job of selecting their piece to be displayed.  I am very proud of them!  


Chalk Landsapes


Things have been pretty busy in the Berry art room lately!  The end of the year seems to always be hectic!  The 5th and 6th graders have completed quite a few projects.

I have been working on my SLO's and trying to pin point what lessons I want to be teach next year and include in my SLO's.  It has been difficult to figure out how to go about this, especially since I am the only teacher in my district that teaches 5th and 6th grade art.  I wanted to be able to compare notes with another art teacher of my grade level so I contacted Drew Thomas, the 5th and 6th grade art teacher in a neighboring district.  We have been able to meet a couple of times and during one of our visits he shared this project with me which I promptly took back to my classroom and tried out with my 6th graders!  I love this project.  The wonderful thing about it is that practically anything goes.  So if a student "makes a mistake" I just tell them to go with it and that there is no such thing as a mistake in this project!  

Chalk Landscapes

First I introduce my students to Robert Duncanson and I explain that he was an African American artist in the 1800's.  During this time period, for an African American to become a successful artist was quite an accomplishment.  He was part of a movement of artists called the Hudson River School, who painted natural landmarks.  I showed the students "Blue Hole, Little Miami" and explained that it is an actual place about 30 minutes from our school and if you hike on a trail you come across this and it looks almost exactly like it did in the painting, painted over 100 years ago!  


I then go on to explain that a successful landscape consists of a background, middle ground and foreground.  The screen that I project on is my whiteboard so I trace over the horizon line in the painting with a dry erase marker.  Then I trace over the line that divides the middle ground and foreground to show the students each individual section of the painting and that this gives the painting depth.
I tell the students that they will be creating a landscape in chalk pastels.  We tear a piece of 9x12" construction paper, horizontally to make the shape of a mountain range.  This will be the horizon line.  then I show the students how to color the torn edge of the paper, place the torn paper on top of the white paper and use a tissue to rub the chalk onto the white paper.  This creates the mountain range that is the farthest away.  The remainder of the landscape is made in this way of rubbing various colors of chalk off of the construction paper onto the white paper.  


Thursday, March 27, 2014

Art Show Selection


This is the first year that I have had my students keep portfolios.  Every time they finish a project instead of going home the project is placed in each student's portfolio.  Last week and next week (we are on spring break this week) the students are each selecting one piece of art work to be displayed in the district art show in May.  On the day of selection all portfolios are passed out and the students are asked to lay out all pieces of art on their table.  I then instruct the students to choose a piece of art work that represents their best work in the portfolio and turn it in by placing it on the table in the front of the room.  I have signs for each project so that while the students are turning in work I can see how many of each project I will have for that particular class.  If I see that there is a low number of a project or too many of something we can adjust for that.  So far this is going very well and the students are all making great choices of work to put in the art show.  The next step will be to mount and tag all of the art work.  Each class has a designated folder that I keep art work in to transport to and from the art show (the high school).  All of the 3-D work has been tagged and is packed in boxes ready to go!


 Here are some of my students' portfolios:


Here is the table where the students submit their art work


Notan

These are some of the many finished notan pieces by 6th graders.  It was a good one day project.  Next time I think we will use larger paper.  I only had 9x12 construction paper this time.  More about this lesson can be seen on this post.


Sunday, March 9, 2014

Op Art and Some other Ramblings


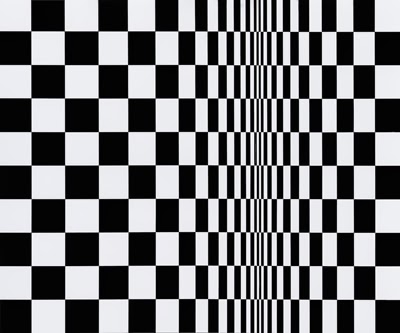
Movement in Squares by Bridget Riley


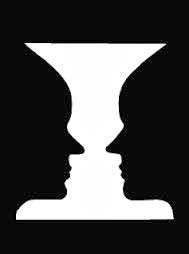
The 6th graders took a look at some of Bridget Riley's paintings and we talk about how op art works: It is a figure/ground relationship.  I show them the well known face/vase optical illusion.


I explained that our eyes will automatically see one or the other:  the vase or the two faces looking at each other.  We have the ability to train our eyes to see both but our eyes will see one or the other at first.  The figure is the object that you see coming out at you and the ground is the object that is pushed back into space.  

I also show them a video of the work of Victor Vasarely.  I found a link to this video on You Tube through this Pinterest site.  Pretty cool video!

The 6th graders created their own op art.  They started with a quarter-size circle in the middle of their paper and then added more circles around it.  I had to warn the students not to draw too many circles because the first time I taught this project I noticed that the students will easily go overboard with the amount of circles and lines that they draw.  

After the students drew concentric circles they drew 5-7 interesting lines.  I encouraged the students to draw interesting but simple lines. 

The next step was to mark all of the areas that would be painted black.  We did this with a small pencil mark inside each shape that was designated to be black.  The designs were painted like an irregular checker board.  There were no two black shapes side-by-side and no two white shapes side-by-side.  


When it was time to paint I demonstrated a few tips on painting neatly.  
1.  Point your paint brush toward the outside edge of the shape to get the smoothest line possible.
2.  Hold your brush like a pencil and down by the bristles.
3.  Reload your paint brush when it starts to get dry.


During the 16 years that I have taught, there have been some things that I have realized are important when teaching this number of 5th and 6th graders (close to 1,000) with once-a-week-for-40-minutes-schedule.  I want to keep my students engaged in my lessons, and it is easy to loose the interest of students when projects take too many weeks to complete.  There are some wonderful projects out there that I would love to teach to my students and I have, unfortunately had to rule them out because they are too lengthy.  

I am always trying to find the right balance between lessons that are meaningful to the students, align with the state visual art standards and use practical materials.  Practical to me means that the students can clean it up within a 5 minute time frame. Taking more than 5 minutes to clean up takes away from precious work and instruction time when you have 40 minutes for each class.   It is difficult to choose lessons that meet these criteria and fit in one, two or three 40 minute classes.  

...AND now that we are adapting the SLO's to our evaluations this has brought more to the table when it comes to choosing what will be included in the assessments.  This year is our pilot and next year we will using the new evaluation system completely.  I have been working on developing what I can at this time, of my SLO's and choosing lessons that fit.  I feel like it has already made me a better teacher, but I am still in the thick of it!


Tell me your thoughts on this in the comment section!  I would love to hear how you deal with these issues when planning your art lessons!  Feel free to disagree with me too! My feelings will not be hurt.


Warrior's Choice:  Chalk boards


 Chalk boards are another activity that are provided for "Warrior's Choice," the activities that are meant for that time after projects are completed and before the end of class.  There were a stack of chalk boards in the teacher lunch room one year with a "free to a good home" sign on them.  I snatched them up and they are well used!  The students enjoy drawing on them.